Note: This article contains affiliate links. If you subscribe to a paid account after clicking on one of the links in this article, DigForCent.com team will receive a small commission. You can also donate to our team from
HERE
thanks
Five years ago, I spent a lot of time working as a website developer creating websites. Since that time, I have provided comprehensive plans that include website creation , domain name registration and web hosting.At the very beginning, creating the sites and installing my accounts on web servers required a lot of time and money. With my knowledge of server management, I can buy another server and host all my clients on it. However, there are all kinds of additional things you need to do to manage multiple clients.In this tutorial, I’ll show you how to get started as a hosting reseller and become a serious and professional web host. This is just a simple introduction to the world of web hosting. I highly recommend that you check out the other resources mentioned below. Good reading
1. Points to consider in becoming a hosting reseller
If you are unfamiliar with the world of web hosting, I suggest that you start first by doing your research and learning the basics.
For the most part, the decision to become a hosting reseller is straightforward. Either you see it as a way to make money or you want to give your existing customers extra service and also make even more money.
Reselling web hosting is a fantastic way to generate recurring income each month and at the same time keep growing your design business.
While it’s easy to start reselling web hosting, Owning a web hosting business is a lot like any other business. It takes a lot of work, effort, and start-up capital to become a successful web host.
There are some things you will need to consider before you take the leap and become a web host. These factors include the following:
2. Buying a server where your customers' accounts will be hosted.
3. The disk space and bandwidth you have available.
4. Your skills in server management.
5. Tools for creating and managing your clients' accounts.
6. Your availability for technical support.
7. The prices of your web hosting plans.
8. Advertising and Marketing
I will present to you 8 points that I believe are essential in the success of becoming an internet hosting reseller.
1. Budget

Maybe the readers have asked this question:
If you want to launch your project without breaking the bank, plan a budget of around $1000 . This includes:
✔️ Registering your company.
✔️ 12 month subscription for a basic reseller plan.
✔️ Billing software such as WHMCS (One license costs $ 18.95 / month for 250 customers).
✔️ High speed internet connection
It is also possible to start reselling the hosting for much less.
Many start with a budget of around $20 or $30 per month . However, they are not considered legal businesses, as they are not registered with the enterprise registrar and are not in good standing with government authorities.
These kinds of people who own fictitious business names never pay tax and risk legal action. In addition, their chances of attracting customers are slim. This will inevitably lead to the failure of their plans to become a web host.
2. Choose the right hosting reseller plan

You have different options available to you for hosting your clients’ sites.
Depending on your technical knowledge as well as your budget, you can choose one of the following options:
Classic Hosting Reseller Plan:
This form of website hosting is often the cheapest and easiest way to start a hosting business .
Using a control panel (exp. WHM) you can manage multiple clients who will also have access to a control panel (exp. CPanel) to make changes and updates to their service.
Many customers may not have knowledge or experience in this area and will be completely dependent on you for the configuration and changes of their service.
This allows you, the reseller, to charge a little more for this convenient service. This type of plan is considered a shared hosting sub type. Your account is located on a server that you will share with other hosting companies and individuals but which remains isolated from other accounts.
VPS hosting:
Virtual Private Servers or even VPS is a virtual “slice” of a much larger primary server node.
The primary server node is often a very powerful dedicated server that is divided into several different virtual environments.
While it is possible to become a reseller on a VPS plan, these accounts are generally intended for development purposes only because resources are somewhat limited compared to other forms of hosting.
Regardless of this fact, many consider VPS hosting to be a great transition from reseller hosting to a dedicated server. It’s good to have while your business grows.
Dedicated servers:
A dedicated server allows you to use all the resources of a single server. The equipment is owned and operated by the company that owns the data center where the server is located.
By purchasing a dedicated server, all machine maintenance and troubleshooting is the responsibility of the data center.
Dedicated hosting allows you more flexibility. In fact, you can install whatever you want on your server and host as many clients as you like.
Colocation Servers:
If you have your own server and know the ins and outs of server management, you may choose to run it from a data center.
Server colocation allows you to store your machine in a safe place, equipped with the various possible safety devices (fire protection, emergency power generators, etc.).
You can also set up your own hardware and software for your web hosting business.
3. Essential tools to have to become a web host
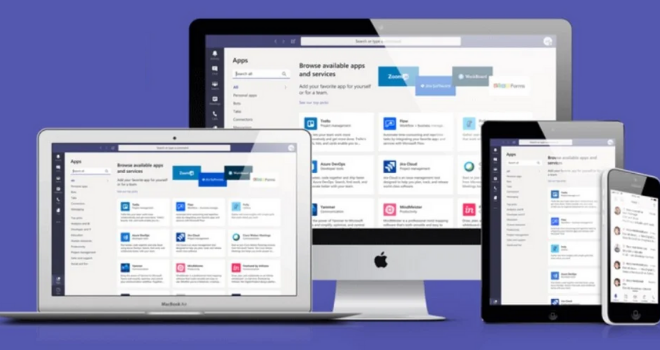
It is important to plan to provide your customers with a control panel so that they can easily access and manage all the tasks related to the maintenance of their sites.
For example, create new email accounts, monitor disk space usage and bandwidth etc.
cPanel is the control panel most used by web hosts. You have to be prepared to spend around 48 dollars / month / 100 Accounts to have the cPanel license in order to be able to use it on a dedicated server.
It’s very inexpensive considering the control panel that my clients get. There is even a way to get this license for free!
Some web hosting resale plan providers offer the cPanel / WHM license for free. That’s why it’s recomanded to buy a reseller account with NameCheap.
WHM / cPanel
Webhost Manager (WHM) is the tool of choice to help you become a web host. It allows you a host of functions:
✔️ Gather information about the specifics and status of the server.
✔️ Creation of list of customer accounts, pending accounts.
✔️ Modify the bandwidth usage of clients.
✔️ Change their passwords.
✔️ Create pre-established hosting packages.
✔️ Terminate an account and even more.
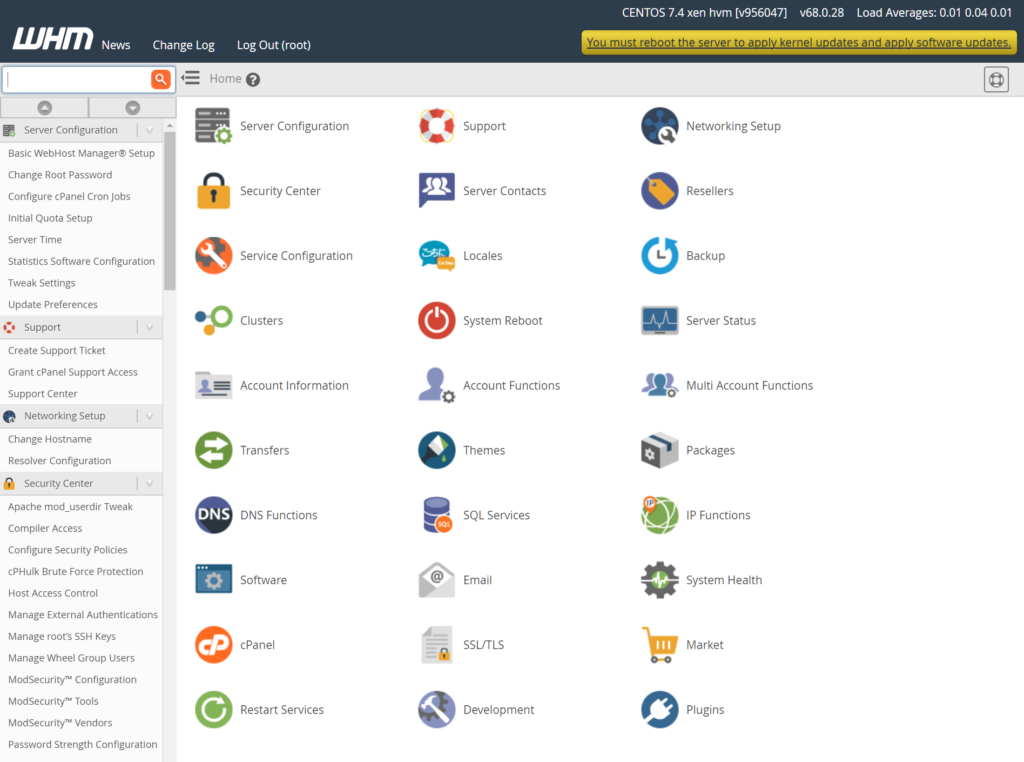
The difference between WHM and cPanel
Some people still confuse between WHM and cPanel. Here is the differences between the 2 control panels.
What is cPanel?
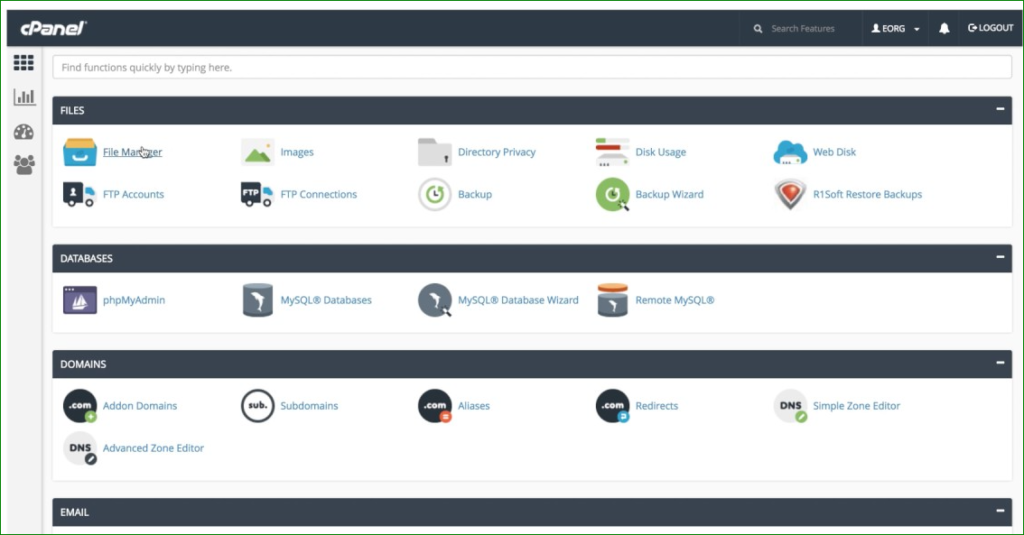
cPanel is a login portal where you can manage websites and emails.
It is used by website owners or web developers to upload files, manage databases, create email accounts, perform web / email transfers, and more specific setups associated with websites and email.
It also allows you to install CMS applications and change FTP passwords, database user passwords, or email account passwords. Changing the DNS can also be done here for domain names added to the account.
What is the WHM?
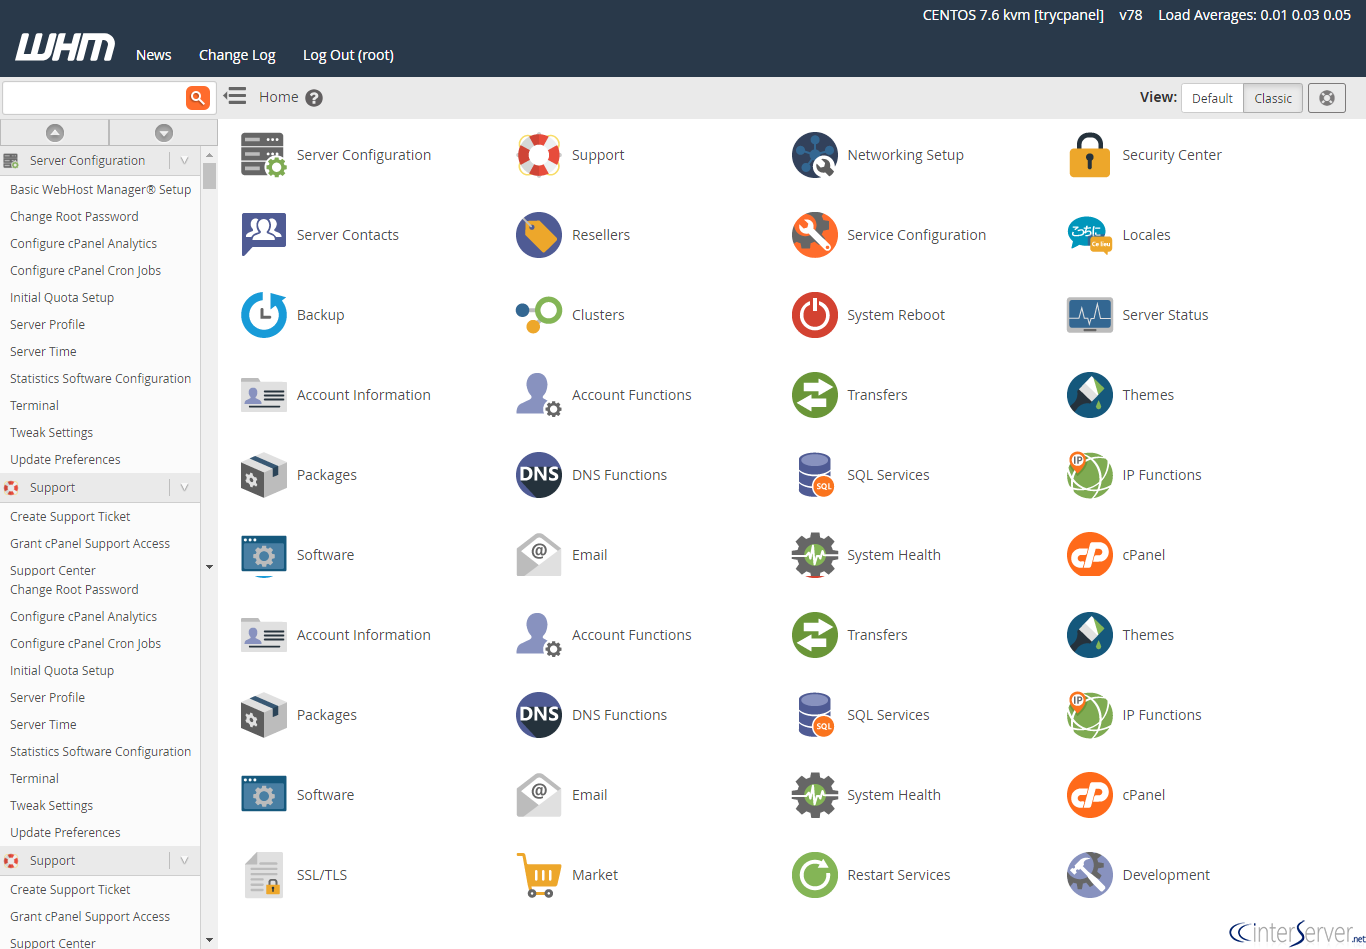
WHM (Web Host Manager) is a control dashboard that gives the user the ability to manage multiple cPanel-based sites.
In WHM, you can:
- Create individual accounts.
- Create custom hosting packages.
- Add domains to the server.
- Manage features of hosting packages and accounts.
- Reset passwords/contact email addresses for cPanel accounts.
- Edit Resource Limits for cPanel accounts.
- Modify DNS zone records for each domain/subdomain.
- Setup private nameservers on the server.
- Access resold accounts without entering login details.
- Perform basic system and control panel maintenance.
What is personalized hosting plans?
You can create your own personalized hosting plans with WHM. When creating a hosting plan , you can:
- Define the disk space allocated to the hosting package
- Define the bandwidth that can be used
- Define the number of FTP accounts available for the Pack
- Define the maximum number of email addresses available for the pack
- Define the number of additional domain allocated.
The best way is to include the most free services in your hosting package, which are offered at an additional cost by other web hosts.
For example, you can offer site creation and SEO in the same package as web hosting at no additional cost. Obviously, you will need to adjust your prices accordingly.
How to create a personalized hosting plans on WHM?
1. Connect to your WHM interface and click on the ” Add a package ” tab located in the ” Packages ” section of your WHM.
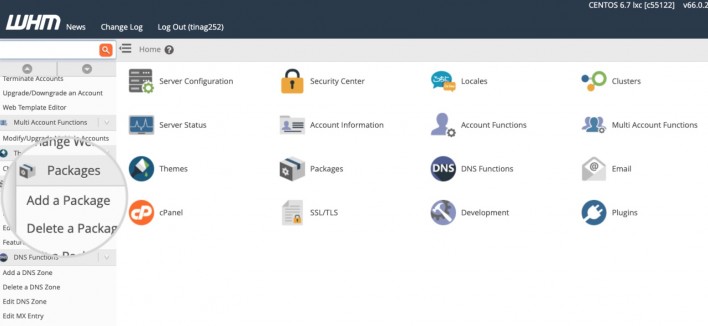
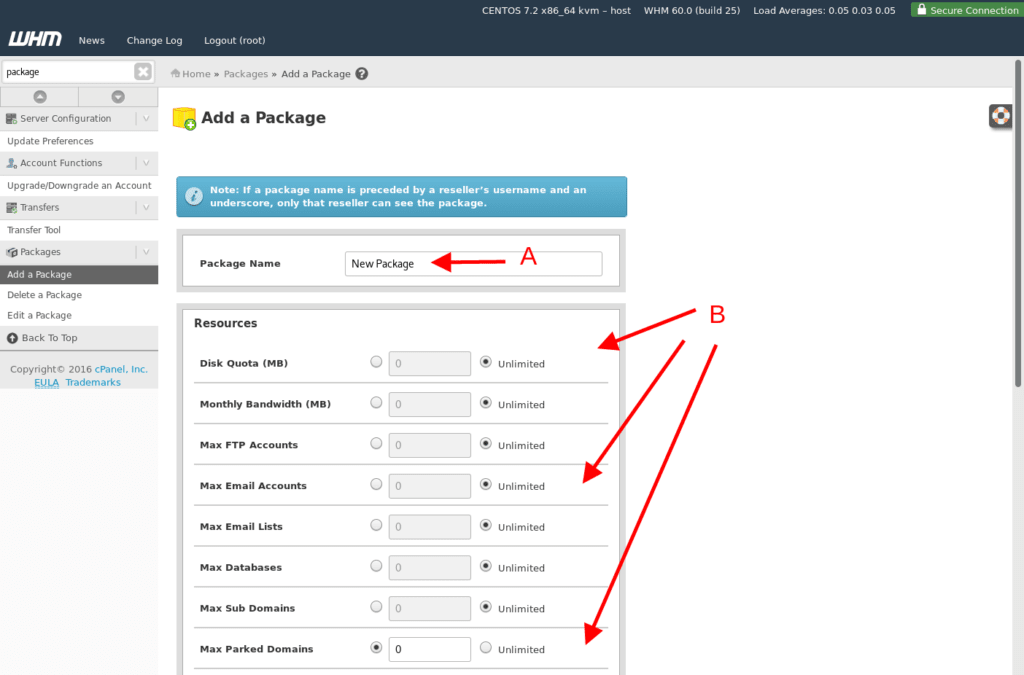
2. Fill in the following information:
- Package name: this is the name you will give to your package
- Disk quota (MB) : this is the disk space quota that will be allocated to this formula.
- Monthly bandwidth (MB) : This is the bandwidth that will be allocated
- Maximum number of FTP accounts: This is the number of FTP accounts that can be created with this pack.
- Maximum number of email accounts: This is the maximum number of email addresses authorized with this package.
- Max Quota per email Address (MB): The maximum disk space quota per email address. The quota is defined in number of MB.
- Maximum number of email lists: these are mailing lists
- Maximum number of databases: You can define the maximum number of databases that can be created with this pack.
- Maximum number of subdomains: Define the number of subdomains that can be created.
- Maximum number of parked domains
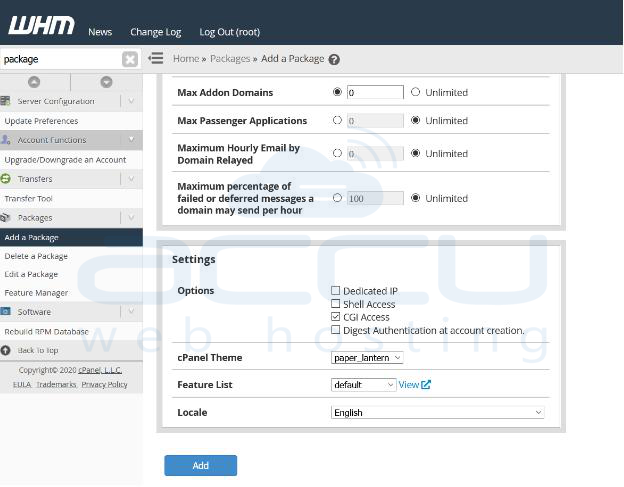
- Number of additional domains : This is the number of domain names that can be added to the customer’s cPanel if they choose this formula.
- Maximum number of emails per hour per relayed domain : this value cannot be modified and is set by default.
- Maximum percentage of failed or deferred messages that a domain can send per hour : Like the maximum number of emails, this value is set by default and cannot be changed.
- Default language of the package
3. Click on the “Add” button at the bottom of the page to save your pack. If “Success” appears at the bottom right of your screen, the addition of your pack was successfully added.
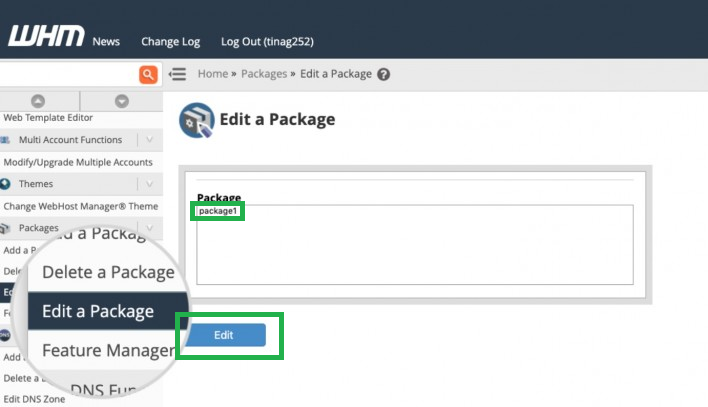
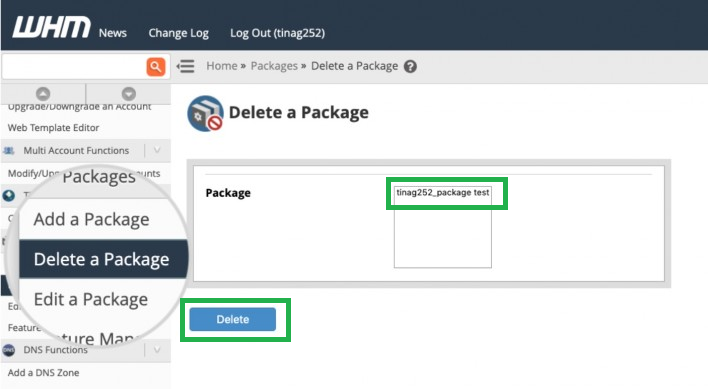
It is also possible to modify or delete the plans you have just created (See the 2 image bellow).
How to create a customer account on WHM?
To create a cPanel(customer) account, you need to create at least one hosting package from WHM (see previous chapiter).
1. Login to your WHM Account.
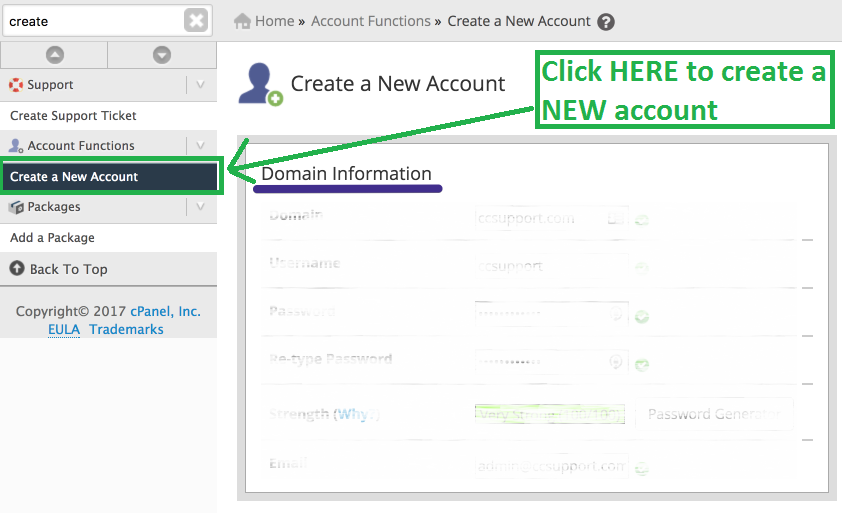
2. Go to Account Functions >> Create a New Account or type Create a New Account in the search box, and the option will appear. Click on it.
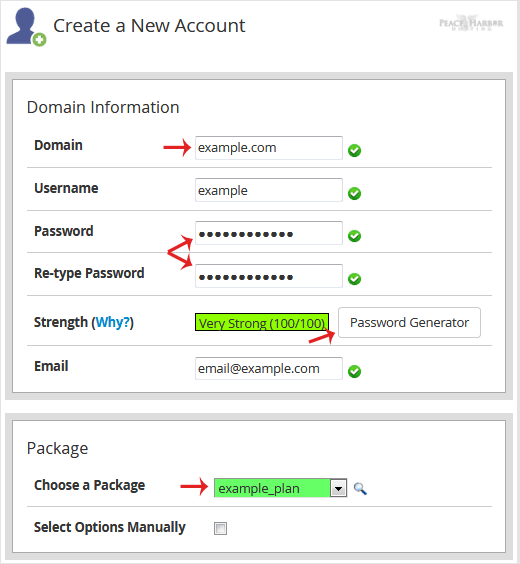
3. Enter the following details under Domain Information:
- Domain: The domain name you wish to host, like example.com
- Username: After you enter a domain name, click on this field, and it will automatically fill up your username or enter any other username you wish to use.
- Password: Enter a password or use a password generator. Copy the password in a safe place. It will be required while accessing your newly-created account.
- Email: Your email address.
- Choose a Package: From the drop-down menu. You can choose a package. If there isn’t any package available, you can create it from the Add a Package option.
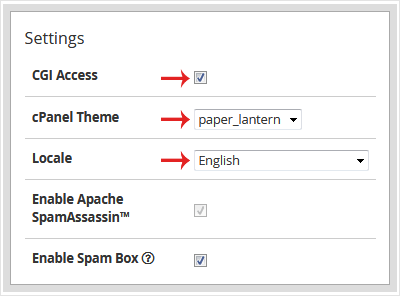
Under Reseller Settings:
- Make the account a reseller one: Leave it unchecked if you do not want to grant reseller access to your cPanel account.
Under DNS Settings:
- Enable DKIM on this account: It is enabled by default. We recommend you to enable it.
- Enable SPF on this account: Tick this option to prevent abusers by sending spoof email on behalf of your domain name.
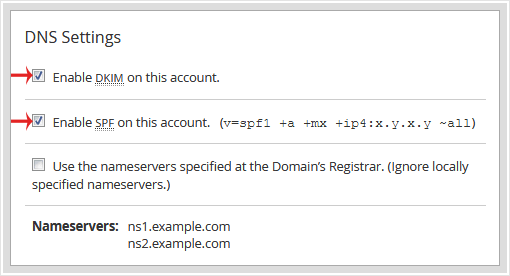
4. Leave all other options as they are. Please scroll down to the Create button and click it.
Your cPanel account will be created successfully.
How to Modify a customer account on WHM?
Changing the settings of a cPanel account from WHM is a simple process and only takes a few times. This process is useful for when a user wants more disk space, Email Addresses, bandwidth or similar items.
1. With WHM opened in your browser, type “modify an account” into the search box, this will sort the menu options for you. Then find and click “modify an account” see image bellow.
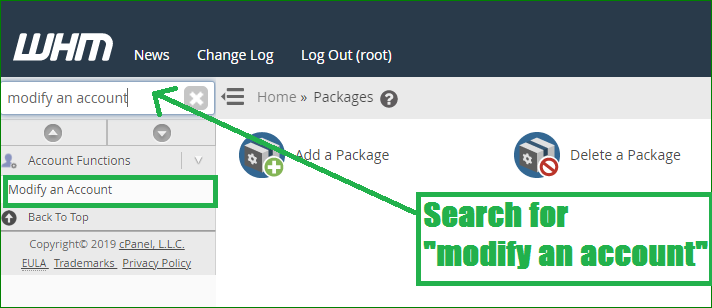
A list of accounts is displayed.
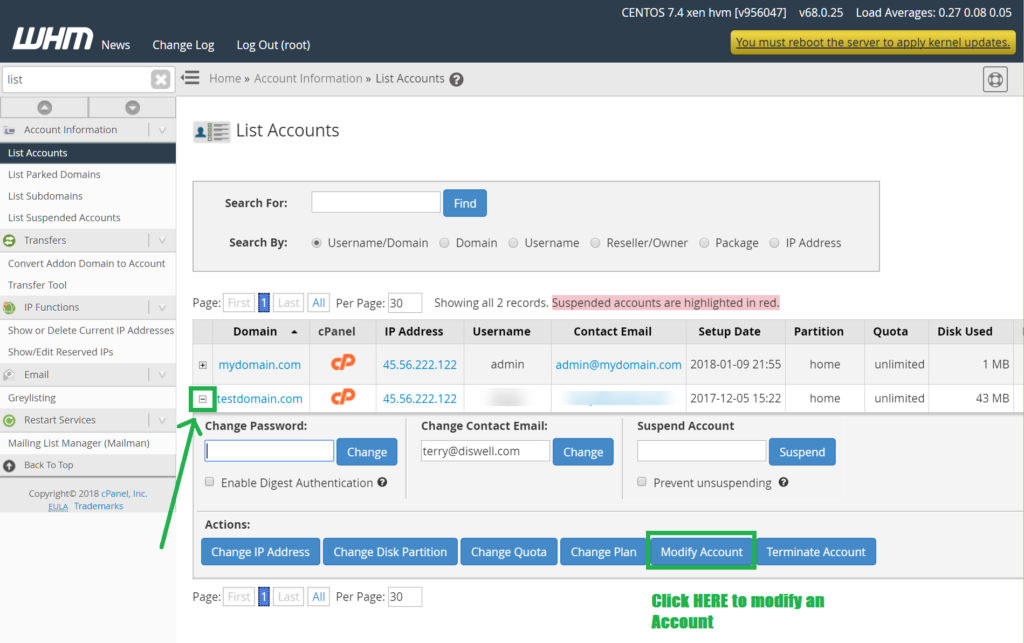
2. Click the + button next to the account you wish to modify to expose additional options. Select “Modify Account” and modify every thing you want to change . see bellow image
How to Suspend cPanel user from а WHM Account?
There are times when you are forced to suspend a customer’s account because they have not paid their bill or because they have exceeded the limits allowed by their hosting plan. Here’s how to do it:
1. Login to your WHM Account.
2. Go to “Account Functions” >> “Manage Account Suspension” or type Manage Account in the search box, and the option will appear.
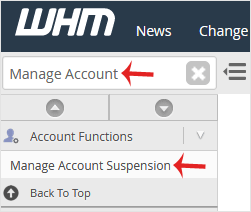
3. Under “Select by Domain”, choose the user you wish to suspend or, should you know only the username, select the user under Select by User from the Drop-down list.
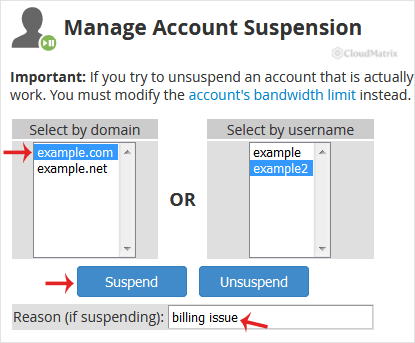
4. If you want to add a suspension reason, type the reason in the text field or leave it as it is and then click the “Suspend” button.
The account will be suspended, and it will display the suspension message. You can read it to verify if the account is suspended or not.
WHMCS
WHMCS is the largest billing automation platform used by tens of thousands of web hosts.
Here is an overview of what WHMCS can offer

4. Branding, promotion and marketing of your business
Some of the reseller hosting plans give you the freedom to control the control panel of the customer’s hosting accounts so that you can put your company logo there for promotion and branding.
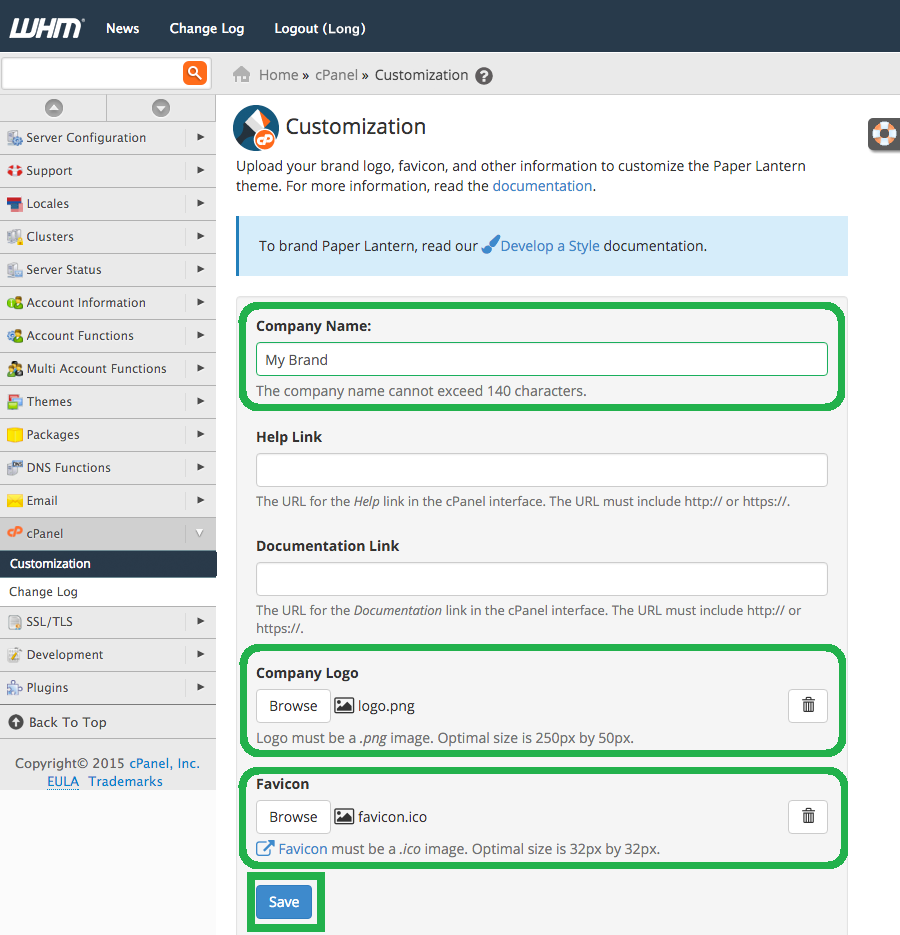
To increase brand awareness, it’s beneficial to provide your customers with a way to identify and associate your brand with the cPanel dashboard. Here is the steps to change the cPanel logo to your own custom logo:
- Log into your WHM dashboard [ex: http://yourdomain.com/whm]
- Navigate to
cPanel > Customization - Type in your company name
- Upload your company logo
- Upload favicon
- Click Save
You also get free ad credits from some reseller hosting plans, allowing your customers to promote their business on social media platforms like Facebook, Twitter, Google, Yahoo, Bing, etc.
You can use these free credits to target specific audiences through pay per click (PPC) advertising, which appears at the top of search results or on the side of search results.
I also recommend that you advertise your business on social media because the online market is very competitive making PPC costs sky-high.
I also recommend doing different things to set yourself apart from other web hosts. For example, if the majority of people you know (or existing customers) operate in some type of industry like the restaurant business, you could become a leading web host for restaurant websites.
Of course, these are just the basics of starting a web hosting business through reseller plans, but it is a difficult task, to say the least, that requires hard work, patience, dedication and careful market research.
If you get the basics right, with strong determination and the right tactics, you can certainly become a successful web host in the web hosting arena.
5. Offer a quality service 24/7

Another key recommendation from our reseller hosting business start-up guide is to provide excellent 24/7 service.
Even some of the biggest web hosting companies don’t have 24/7 sales coverage, but tech support needs to be available 24/7.
You can’t become a great web host without providing 24/7 support to your customers.
Since you are starting out slowly with a reseller hosting plan and don’t have a big budget to start with, you should find a company and outsource technical support so that whenever your customers have questions there will be someone there. ‘one to answer their concerns in less than 30 minutes .
If you can’t respond within 30 minutes, you risk falling far behind your competition and losing a good deal of market share.
Once you get enough customers, you can start hiring people to work directly for you and slowly remove the outsourced tech support service. This will give you full control.
The best support can only be provided by your own staff. No outsourcing company can support your customers better than you.
If your server goes down and a customer complains about downtime, go ahead and give it credit. They will see that you care about their business and you share the loss with them. They will feel that you are working with them and not against them and will stay with you forever.
6. Use private nameservers
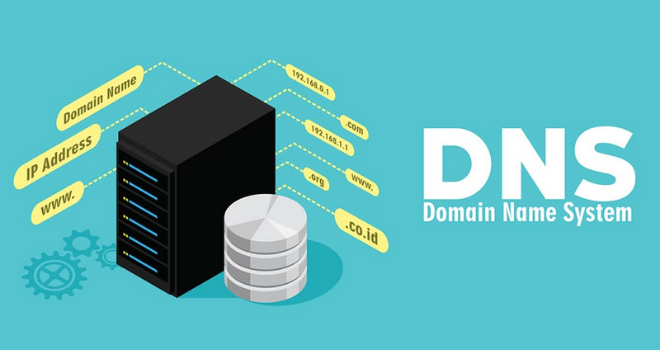
Let’s explain why this is an important part in the process of becoming a web hosting reseller.
There are many advantages to using private name servers. First of all, it makes you look professional.
Second, it makes it easy for you to switch between hosting providers in case you get disappointed or the service deteriorates and you need to switch hosting providers.
Private nameservers will give you the ability to migrate all of your customers’ web hosting accounts without asking them to make any changes on their end.
After the migration, the only thing you will need to do is change the IP addresses of the name servers from the old hosting company to the new IP addresses provided by your new hosting provider.
Setting up private name servers is the first thing to do once your reseller account is activated. They are registered with the domain registrar where you registered your domain name.
Once the name servers are registered, you must also add DNS type “A” records in the DNS zone of your domain. This can be done from WHM -> Edit DNS Zone.
Ask your hosting provider to do this for you if you are not sure how to do it.
7. Install an SSL certificate

Security is an essential part of setting up your hosting reseller business.
If you want to sell web hosting, you will need to store your customers’ personal data such as names, addresses, emails, credit cards in your billing system (eg WHMCS) on your server.
Your customer should feel safe knowing that their personal data is secure and that no one will steal it. That is why you need an SSL certificate which will encrypt the communication between the server and the visitor.
As a result, a third party will not be able to intercept the traffic to steal important information.
It is best to order a wildcard certificate that will protect both your website and your billing system if you are installing the billing software on a subdomain such as secure.yourdomain.com.
Another option is to install it at www.yourdomain.com/clients and in this case you can use a cheaper certificate such as NameCheap SSL certificates. If you want to be more professional in the eyes of your visitors, opt for an Extended Validation Certificate (EV). It will add a green bar on the browser and also display your business name.
8. Determine the prices of your plans
How much and how will you bill your customers? There are far too many web hosts on the market. Depending on the type and complexity of the hosting product, prices for hosting services can vary from $1 to $1000.
Once you’ve established your fixed and recurring costs, you know where to break even. Use this number to determine the selling price of your products. Customers who need more bandwidth and space may be billed at a higher rate.
It is very difficult to compete with the big players in the web hosting market. I don’t believe it will be possible to make any money selling a hosting plan for $1/month!
What I can advise you is not to be afraid and dare to set your prices at levels that will allow you to make a profit. you can charge your clients a minimum of $15/month for the basic plan. None of your clients have a problem with this price, if you offer them a rich package of options and also take care of updating their sites.
There is also a lot to be said about the perception of value. For example, many prefer to pay more for a better service than to pay less and have unpleasant surprises. Finally, “you get what you pay for”. So, they will tend to have more confidence in a $15 all-inclusive site hosting plan than a $4 plan with fewer services.
2. Become a web host with NameCheap
What’s great about NameCheap is that it lets you become a web host in no time and host unlimited domains. The number of clients depends on the disk space you have available.
The basic plan allows you to have 30GB SSD. As the number of your customers increases, you always have the option of upgrading to a higher package.
Doing business with NameCheap is an easy way to cover hardware solutions, space, budget and skills. Your customers will be hosted on powerful servers. You therefore have more leeway to distribute these server resources, you get also a higher level of control including a Web Host Manager (WHM) control panel that allows you to create multiple cPanel accounts with their own login details. As the owner of the reseller package, you can grant the client access to the resold account without giving them access to the main account. You’ll also be able to use the Web Host Manager Complete Solution (WHMCS), billing software that allows you to invoice clients.
Get ready to become a web host
To get started, go to the Namecheap site . Once there, you will have three “reseller” plans to choose from. Choose the pack that meets your needs. For most who are just starting out, the $36.88 Galaxy Expert should be enough.
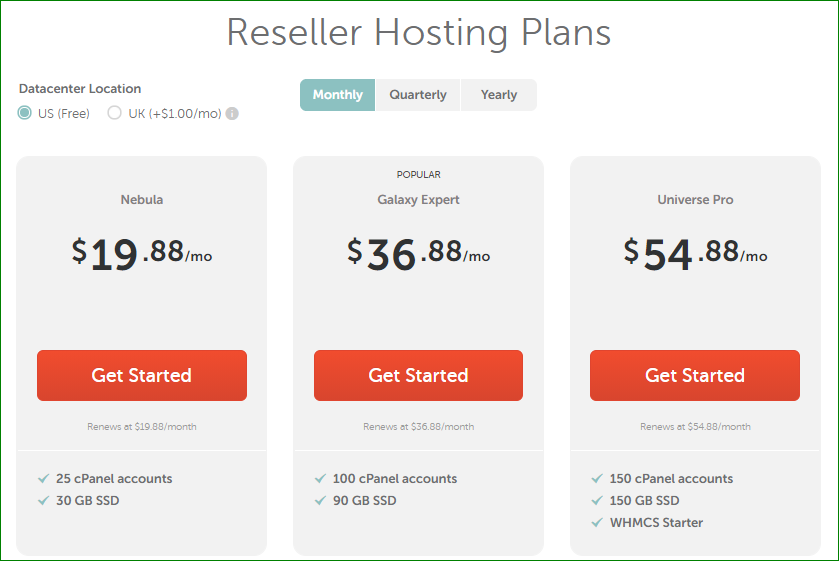
Click on the “Get Started” button and you will be asked to choose your billing cycle (monthly, Quarterly or yearly) in next step you will be asked if you want to register a new domain for your main hosting site (example: yourwebhostdomain.com) or if you want to use an existing domain name that already belongs to you.
and finally, create your account
3. Exactly how much can I earn if I become a web host?
It is important to think about the potential income before becoming a web host. The profits you will make from reselling hosting depends on several factors: The number of customers, the prices of your plans, your costs and expenses etc.
Let’s say you managed to have 30 clients (which is a relatively easy goal) and you offer 3 shared web hosting plans :
✔️ Bronze at 9.99 dollars.
✔️ Money at 12.99 dollars.
✔️ Gold at 14.99 dollard.
Assuming you have 10 clients in each plan. Now let’s do the math:
✔️ 9.99 x 10 = 100 dollars
✔️ 12.99 x 10 = 130 dollars
✔️ 14.99 x 10 = 150 dollars
Total: 100 +130 + 150 = 350 dollars And subtract the charges from Namecheap:
380 dollars- 39 = 341 dollars per month
4. Last word
You should know that it will usually take you around 2 years to acquire the skills necessary to get off the ground and become a profitable web host.
If you don’t have 2 years to learn, then start by hosting sites that you have built yourself. This will allow you to learn gradually.
Putting in place a business plan will certainly help you set the guidelines for the success of your website hosting business.
Good luck and don’t hesitate to contact us if you have any questions.


